Obsah
Daily Records
A detailed description of Daily Records is provided in the Daily Records chapter. This section describes only how to work with Daily Records in the mobile app.
Description of the Daily Records Screen in the Mobile App
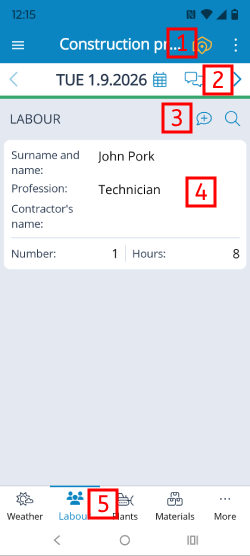
The Daily Records screen is divided into five parts:
1. Control Panel contains, from left to right:
- App menu
- Abbreviated name of the current diary
- Context menu related to the specific day and its current status. \
2. Date Panel displays the selected day and arrows for moving one day backward or forward. Tapping the panel opens a calendar for directly selecting a day. A colored bar below the panel indicates the status of the day.
Day Note (public/private)
3. Current Section panel with its name, section note, and a magnifying glass for searching within the section. Notes are not available for the Performed Works and Additional Records sections.
4. Area for the actual Daily Records of the selected section.
5. Daily Records Sections → you can switch between individual sections either by tapping the section name or by swiping sideways.


Day Note:
A public and/or private note can be added to each day. A public note is visible to all users who have access to the diary, while a private note is visible only to the user who created it. \
The icon for adding and viewing a note is located in the Date Panel (2.). \
Icon with an “empty” speech bubble = no note has been entered \
Icon with a “filled” (white) speech bubble = a note has been entered
Description of Available Menu Options
App Menu

The app menu is available by tapping the icon with three horizontal lines on the left side of the Control Panel. At the top, the menu displays the abbreviated name of the current project, the diary number and full diary name, and the user's account name. Below this is the main menu:
- Diary History – displays the history of visited diaries. Below the list, the Go to Project List button allows you to select another project.
- Diary List – displays the list of diaries for the currently open project.
- Diary Documents – provides access to the Documents section of the diary's Identification Details.
- Work Offline / Work Online – switches the app to offline mode, i.e. without an Internet connection, or back to online mode.
- Settings – takes you to Signature Settings.
- Feedback – allows you to send us a form, for example with suggestions for improving the app.
- Help – online help for the Buildary.online application.
- Log Out – logs the user out after confirmation.
Day Context Menu

The context menu is available by tapping the vertical three-dot icon on the right side of the Control Panel.
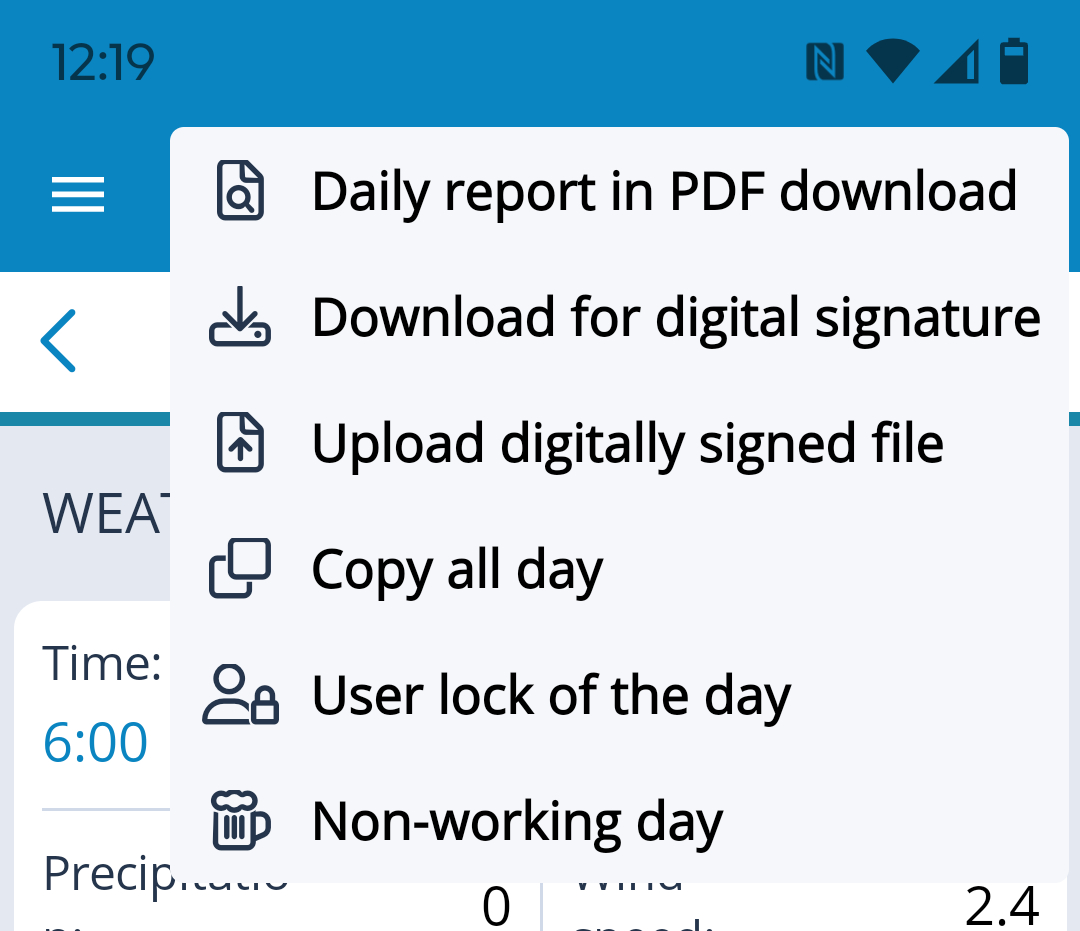
- Download Day as PDF – downloads the Daily Report for the currently displayed day.
- Sign Day OR Download for Electronic Signature and Upload Electronically Signed File – allows you to electronically sign and lock the day according to the configured signature method, either directly in the Buildary app or using an external application. Once signed, the day can no longer be unlocked by a user.
- Copy Entire Day – first displays a calendar for selecting the source day from which data should be copied, followed by a window where you can select sections and filter records by author.
- User Lock Day / Cancel User Lock – locks (or unlocks) the day with its current contents, meaning that records can no longer be added or edited for that day.
- Non-Working Day / Working Day – marks the day as non-working or working. WARNING! Marking a day as non-working will delete all records for that day, if any exist!
The menu always displays only the options that are applicable to the current status of the day.
Day Status

A colored bar below the calendar panel indicates the status of the selected day:
- Red – the day contains no data.
- Blue – the day contains data and is not locked.
- Yellow – the day is in the process of being signed and is temporarily locked against modifications. This status is time-limited. After signing, it changes to green, or, once the configured time limit expires, it returns to blue (or purple).
- Purple – the day is user-locked and can be unlocked at any time.
- Green – the day has been electronically signed and is therefore locked against any further changes. It can no longer be unlocked by a user.
- Gray – non-working day. The day contains no data and is locked. It can be unlocked as long as no signed day exists after it.
Weather Section
Tapping the cloud icon  loads weather data from the Internet (the project must be located on the map).
The loaded values can be manually edited by tapping the relevant row.
A note concerning weather phenomena can be added to the weather data.
All loaded values can be deleted at once by tapping the trash icon in the section panel.
The time at which the weather data is loaded from the server is not important. The server uses either already measured values from weather stations or a forecast, depending on what is available.
Persons on Site / Machinery / Materials, Products and Technological Supplies Sections
Records are added using the entry form displayed after tapping the  button.
To change or edit a record, briefly tap the record. It will open in an editing window where you can modify it.
Pressing and holding a record activates the bulk deletion function. You can then select the desired records using the checkboxes and tap the trash icon in the section panel to delete the selected records.
A note concerning the relevant section can also be added to each section.
When entering records, suggestions from previously saved items are available. Only items from the current diary and section are offered.
Performed Works Section
Records are added using the entry form displayed after tapping the button.
When entering a record in this section, as with Additional Records, the following options are available:
- Use AI to describe the record (from photos)
- Add details to the record using markers on a drawing (if drawings have been uploaded in the project settings and this field is set to Displayed in the diary settings)
- Locate the record on the map (if this field is set to Displayed in the diary settings), either manually or by using the device's current location
- Launch the camera to take photos or record video for the record
- Select and attach a file from the device's storage
The size of an individual uploaded document must not exceed 30 MB.
To change or edit a record, briefly tap the record. It will open in an editing window where you can modify it.
Additional Records Section
Records are added using the entry form displayed after tapping the button.
When entering a record in this section, as with Performed Works, the following options are available:
- Use AI to describe the record (from photos)
- Add details to the record using markers on a drawing (if drawings have been uploaded in the project settings and this field is set to Displayed in the diary settings)
- Locate the record on the map (if this field is set to Displayed in the diary settings), either manually or by using the device's current location
- Launch the camera to take photos or record video for the record
- Select and attach a file from the device's storage
The size of an individual uploaded document must not exceed 30 MB.
To change or edit a record, briefly tap the record. It will open in an editing window where you can modify it.
Additional Records also have their own context menu in the upper-right corner of each record, containing the following options:
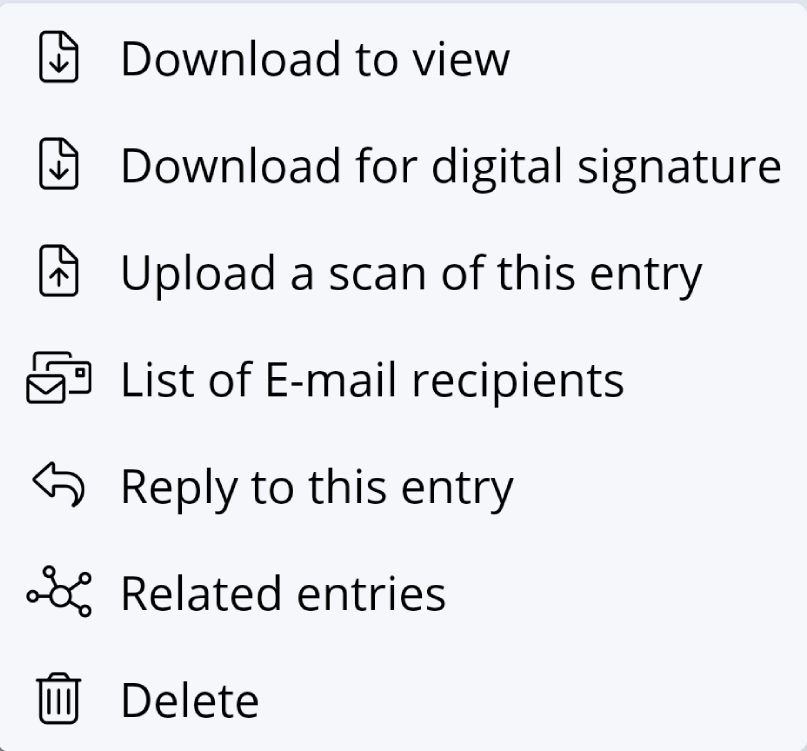
- Download for Viewing – generates a PDF file of the record and opens it in the selected application.
- Upload Scan of This Record – by selecting a scanned, signed record (report) in PDF or JPEG format, the document is uploaded to the record and the record is locked without using an electronic signature.
- Sign Record (OR Download for Electronic Signature / Upload Electronically Signed File) – signs the record according to the signature method selected for the user account.
- Message Recipient List – displays a list of Authorized Persons for the diary, with the option to manually send an email notification about the selected record.
- Respond to This Record – allows you to add a response to the selected record, linking it to the record's discussion thread.
- Related Records – displays the record thread, i.e. the original record and all related responses. Each newly created independent record forms a new thread.
- Delete – allows you to delete the record. This option is not available for signed records.
In the Additional Records section, each user signs their own records. This is a necessary step for successfully signing the day.